Is Your Lawn Mower Ready for Spring? How to Prep Your Equipment Before the Growing Season Starts
Every spring, homeowners across Georgia, Alabama, and South Carolina pull their mowers out of storage, crank them up, and head straight for the lawn—only to find uneven cuts, rough-looking grass, and an engine that sputters or stalls. The problem usually isn't the lawn. It's the equipment. After months sitting idle, your mower, trimmer, and spreader need attention before the first blade of grass gets cut. Taking an hour or two now to prep spring lawn equipment protects your turf, extends the life of your tools, and saves you from an expensive mid-season repair call. Consider it a natural companion to your winter lawn planning checklist—the final step before warm-season grasses like Bermuda, Zoysia, and Centipede break dormancy and start pushing hard.
Quick Answer: What Does Spring Lawn Equipment Prep Include?
Spring lawn equipment prep means sharpening or replacing your mower blade, changing the oil, inspecting or replacing the spark plug, cleaning the air filter, and scraping the mower deck clean of old grass and rust. You should also check your string trimmer line, clean your edger blade, and calibrate your spreader before applying any lawn product. Most homeowners can complete these tasks in one to two hours with basic tools.
Why Dull Blades and Dirty Equipment Damage Your Lawn
Most people think a lawn looks rough in spring because it had a hard winter. Often, the real culprit is a neglected mower. Lawn mower blades that weren't sharpened before storage—or blades that ran over winter debris on the first cut—don't slice grass. They tear it.
Virginia Tech turf specialist Mike Goatley explains it plainly: "A lawn cut with dull blades will have a brownish-white cast where the torn grass tips have died." That discoloration isn't disease or drought stress—it's a wound on every single grass blade in your yard (Goatley). Illinois Extension researchers add that the damage goes deeper: "A lawn cut with a dull blade takes more energy to recover and offers a longer opportunity for disease to infect exposed tissues" ("Mower Maintenance"). In a Southeast climate where fungal disease pressure ramps up fast in spring heat and humidity, that's a real problem.
The same logic applies to every piece of equipment you run. A clogged air filter forces the engine to work harder. Old oil breaks down, leaving engine components unprotected. Fertilizer spreaders with corroded gears or cracked openings can double-apply product in some spots and skip others entirely—giving you uneven growth and potential fertilizer burn. Getting ahead of these issues before the growing season is the difference between a lawn that looks great from April onward and one you spend all summer chasing.
How to Prepare Your Lawn Equipment for Spring: Step by Step
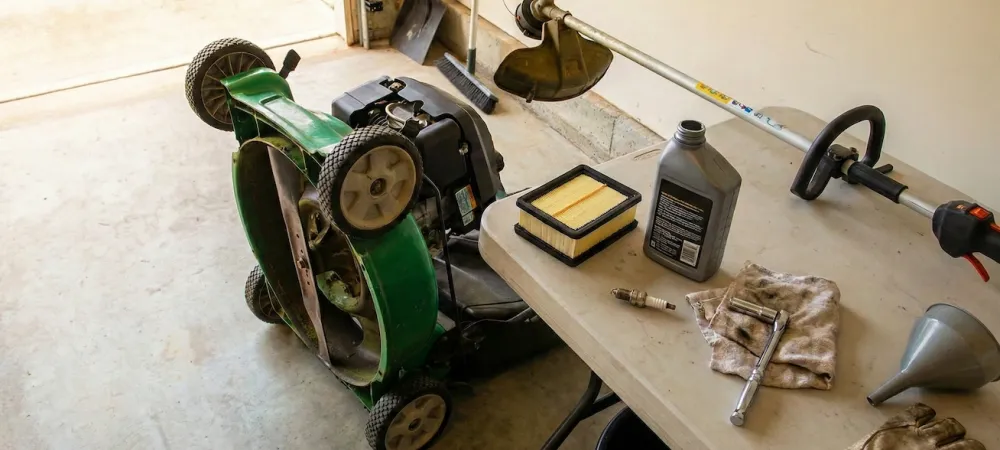
Step 1: Sharpen or Replace the Mower Blade
Start here. Before doing any other mower work, disconnect the spark plug wire to prevent accidental starts. Tip the mower on its side, keeping the air filter side up to avoid oil flooding the carburetor. Remove the blade bolt (use a socket wrench and a block of wood to brace the blade for easier removal), then inspect the blade closely. If it has deep nicks, cracks, or is bent, replace it outright—sharpening a damaged blade is a short-term fix. If it's just dull, use an angle grinder or flat file to sharpen each cutting edge at roughly a 30-to-45-degree angle, matching the blade's original bevel. Once sharpened, balance the blade on a nail or cone before reinstalling. An unbalanced blade vibrates, wears down the spindle, and produces an uneven cut.
Iowa State University Extension turfgrass specialist Adam Thoms offers a practical note for homeowners skipping this step last fall: "Things like sticks or rocks can dull the blades, so it's best to sharpen mower blades immediately after your first mow of the season" . In other words, if your lawn has winter debris, do your first cleanup pass, then sharpen—this is perfectly acceptable spring equipment prep.
Step 2: Change the Oil
Engine oil breaks down over time and picks up contaminants throughout the mowing season. For most residential gas mowers, the oil should be changed at least once a year—spring is the ideal time. Run the engine for a minute or two to warm the oil (it drains more completely), then drain it fully and refill to the dipstick's "full" line with the oil type specified in your owner's manual. Most four-cycle mowers take SAE 30 or 10W-30. Check the manual; using the wrong grade causes more engine wear than skipping the change altogether.
Step 3: Clean or Replace the Air Filter
A dirty air filter is one of the most overlooked reasons a mower runs rough, surges, or burns excess fuel. Paper filters can often be tapped clean if they're lightly soiled; foam filters should be washed with warm water, allowed to dry completely, and lightly oiled before reinstalling. If the filter is torn, heavily clogged, or has been in service for more than two seasons, replace it. The part typically costs under $10 and takes five minutes to swap.
Step 4: Inspect the Spark Plug
Pull the spark plug with a spark plug socket, then inspect the electrode. Light tan or gray deposits are normal. Black, sooty buildup suggests a rich fuel mixture. White or blistered ceramic suggests the engine is running hot. Either of the latter two warrants a replacement, which is inexpensive and takes only a few minutes. Alabama Cooperative Extension recommends replacing spark plugs every 100 hours of use (Garner). If you didn't track hours, one to two seasons of moderate mowing is usually enough mileage to justify a fresh plug at around $4–$8.
Step 5: Scrape and Clean the Mower Deck
Grass clippings packed under the deck hold moisture against the metal, accelerating rust and degrading airflow—which means a worse cut and a shorter deck lifespan. Use a putty knife or plastic scraper to knock off compacted clippings. A pressure washer or garden hose with a stiff brush handles remaining buildup. Let the deck dry fully before mowing. Some homeowners apply a light coat of silicone spray or a dry lubricant to the inside of the deck to reduce future buildup of clipping.
Step 6: Prep String Trimmers, Edgers, and Spreaders
These tools rarely get the same attention as mowers, but they contribute just as much to the finished look of your lawn. For string trimmers, check the line spool for cracks and load fresh line if what's left is brittle or short. Clean the head, inspect the guard, and check the shaft for cracks if it's a gas trimmer. For gas edgers, run through the same oil, air filter, and spark plug checklist as you do for your mower. Blade edgers should have their blades inspected for chips and replaced if needed—a dull edger blade tears turf edges rather than cutting them cleanly. For spreaders, rinse the hopper and spinner plate, check the gate opening and cables for corrosion, and calibrate the setting against the product's label before you apply anything. An uncalibrated spreader is one of the fastest ways to create irregular fertilizer distribution or over-application burn.
DIY Maintenance vs. Professional Tune-Up: Which Makes Sense for Your Equipment?
For most homeowners with a single walk-behind or riding mower, the steps above are fully manageable DIY tasks. They require basic mechanical comfort—nothing more. The equipment, supplies, and replacement parts (blade, filter, plug, oil) typically run $30–$60 total, less than most shop service calls.
That said, a professional tune-up becomes worth it in a few specific situations. If you own a riding mower with multiple blades, belt-driven components, or a complex deck system, professional servicing ensures proper blade balancing across all spindles and tension checks on drive belts—things that are harder to do correctly without specialty tools. The same applies if your mower has spent more than one season without maintenance: a technician can check carburetor function, fuel system integrity, and throttle response in ways a basic DIY check won't catch.
For newer electric or battery-powered mowers, spring prep is simpler—blade sharpening, deck cleaning, and battery inspection (look for swelling, corrosion, or capacity loss). These machines have fewer wear components, but the blades still dull and the deck still rusts.
One note specific to the Southeast: if you use a spreader for pre-emergent applications—an important first step in weed control before soil temperatures climb—calibration matters more here than in cooler climates. Applications that miss windows or are applied unevenly can let crabgrass and other warm-season weeds establish before your lawn fills in. While you handle equipment prep, it's worth thinking ahead about early spring fertilization timing for your grass type, too.
Simple Habits That Keep Your Lawn Equipment Performing All Season
- Clear the lawn of sticks, rocks, and debris before every mow. Hard objects are the leading cause of blade nicks and engine shock during the season.
- Clean the deck after every three to five mows, or any time you cut wet or overgrown grass. Clipping buildup accelerates rust and reduces cutting quality faster than almost anything else.
- Sharpen blades at least three times per season—before the growing season, in late spring, and again in midsummer—as recommended by Virginia Tech Extension (Goatley). High-growth periods may require more frequent sharpening.
- Add fuel stabilizer to your gas tank if the mower will sit unused for more than 30 days. This prevents carburetor gumming and starting problems when you return to regular mowing.
- Store equipment in a dry, covered space at season's end, with fresh oil, a clean deck, and a charged battery (for electric models).
- Keep a spare blade on hand. When you hit something and need to swap blades mid-season, having a backup means you don't lose a mowing day.
- Monitor soil health alongside equipment health. Even a perfectly maintained mower can't compensate for compacted soil—learn more about how soil compaction affects lawn health in the Southeast.
When Professional Lawn Care Is the Smarter Move
Equipment prep gets your gear ready—but it doesn't replace what a trained lawn care technician can do for your turf. There are a few moments in spring when professional help pays off significantly.
If you notice your lawn coming out of dormancy with thin, patchy, or uneven color even after a clean first mow, that's often a soil or nutritional issue rather than an equipment problem. A professional evaluation can identify whether your lawn needs lawn aeration services to relieve compaction, a custom professional lawn fertilization plan based on your grass type and soil needs, or treatment for early-season disease, which in Georgia, Alabama, and South Carolina can appear as early as late February in mild years. Our blog on spring lawn pest activity covers what to watch for as temperatures rise.
The other consideration is simply time. Blade sharpening, oil changes, and deck cleaning are straightforward, but if you have a large property, multiple pieces of equipment, or a busy schedule, professional equipment servicing—paired with professional lawn care services from a team that already has all equipment dialed in—can be more efficient and cost-effective than handling everything yourself.
Your Lawn Starts With What's in Your Garage
The condition of your equipment directly shapes the condition of your lawn. Clean cuts mean faster grass recovery, less disease pressure, and a more polished result all season. Spring equipment prep—a sharpened blade, fresh oil, a clean deck, and ready trimmers—takes less time than most homeowners expect and pays dividends from the first mow through fall.
At Unlimited Lawn Care™, we've helped homeowners across the regions build and maintain beautiful lawns for 28 years. If your lawn needs more than good equipment—if it needs expert fertilization, aeration, weed management, or pest control—our team is ready. Call us at 678-325-7255 or get a free quote online to schedule your spring lawn care program.
Sources
- Garner, Marcus. "The 10 Steps of Lawn Mower Maintenance." Alabama Cooperative Extension System, Alabama A&M University, 9 Dec. 2024, www.aces.edu/blog/topics/lawn-garden-urban/the-10-steps-of-lawn-mower-maintenance/.
- Goatley, Mike. "Sharpen Lawnmower Blades Now for a Perfect Spring Lawn." Virginia Tech News, Virginia Tech, 15 Apr. 2024, news.vt.edu/articles/2024/04/ext-sharpen-lawnmower-blades-for-a-perfect-spring-lawn.html.
- "Mower Maintenance." Illinois Extension, University of Illinois Urbana-Champaign, extension.illinois.edu/lawns/mower-maintenance